Author: Colin Northway

  • Apple is Gambling

    I personally don’t like to gamble. I don’t like slot machines or roulette. The decisions you make are too inconsequential.

    Have you ever looked at the payout odds for roulette? No matter how you bet your percentage return is always the same. On average you’re going to lose 5 cents for every dollar you bet. It’s true that there are a lot of options in roulette. A lot of choices to make. But none of them have any impact on the game. You’re always going to lose about 5 cents for every dollar you bet.

    Slot machines are the same. You can decide how much you want to bet and you can decide how many “lines” you want to bet but all your doing is deciding how quickly or slowly you lose your money. Even then, casinos tend to doctor the odds so that lower-cost slots have a worse payout in an attempt to even out the money-lost-per-hour of all slot machines.

    So in slots, roulette, and other casino games it’s impossible to make a choice that impacts the game.

    If you are a game author like me, shit like this makes you really curious. It’s hard to make a good video game, lots and lots of us have tried and failed. But here is a simple set of games where players literally make no decisions yet sit enraptured by them. The world wide gambling market is worth over 300 billion dollars while the videogame market is worth less than 70. Amazingly, the majority of that 300 billion dollars comes from people playing games where their decisions have no impact on the game.

    Pachinko Players by Miguel Michán

    But every pillar of game design that I respect is fundamentally rooted in player choice. So why the hell are all these people deciding to give money to casinos?

    So far my only answer has been cash payouts. Yeah, slot machines are pretty simple skinner boxes. But even in a skinner box you need to give the pigeon something they care about. If you awarded the pigeon “points” for hitting a button then it would lose interest pretty fast. The cost of hitting the bar dwarfs the potential gain of the payout.

    So it has been with slot machines. Downloadable slot machine games have been around for as long as games. They never really went anywhere because with no cash reward and no interesting choices the skinner box collapses. Until now. Ladies and gentlemen I would like to present to you, Slotomania:

    Slotomania and, ridiculously, Slotomania HD are both on the iPad top grossing apps chart. That means people are dropping a lot of money into a slot machine with no payout. The skinner box has no clothes but it doesn’t seem to matter.

    How did Slotomania manage to turn the Skinner Box back on? Well check out the bar at the top of that Screen shot. Can you guess what that is?

    That’s an xp bar. You can level this slot machine. When you level you get access to more games (well, the same game reskinned) and you raise your minimum bet. You gain xp purely by spending credits. The more credits you gamble the more you level. Of course you run out of credits about two and a half games in so the only way to unlock more is by paying real money.

    I also think they trade off the associations that casino gamblers already have with slot machines. By mimicking casino slots they can hijack the Pavlovian response people have already built up around traditional slots.

    This is genius, evil, and Slotomania has been making money off of it on iPad and facebook for two years. They had been refining their strategy and becoming more and more profitable until, shock, last year Ceaser’s bought them and they really started to make money.

    It’s these kind of brain hacks that make me really uncomfortable. Ceaser’s and Slotomania basically earn their money from failures in the human mind. They can compel us to play their shitty games and they can compel us to pay them money to do it. They don’t offer us a system to master or anything you might define as “fun” in return. They just reach into our brain and make us dance to their tune.

    Gambling and slot machines have historically, and sensibly, been deemed bad for society and often made illegal. Why Apple has decided to let them loose on its walled garden is beyond me. They’re gambling that the government isn’t going to step in and try to put things in order. If they lose that bet then the laws will be broad and ham fisted and we’re all going to wish they’d just stayed the fuck out of the casino.


  • Embrace the Chaos with Pineapple Smash Crew

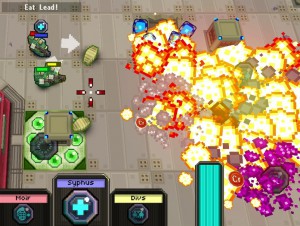
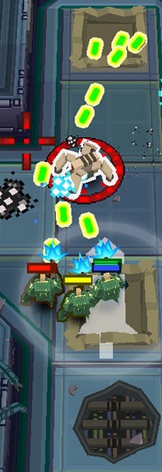
    Today Richard Edwards’ game  Pineapple Smash Crew was launched on Steam and Desura and it’s totaly awesome! I was lucky enough to play it before its release and I’d like to review what I think makes it such a great game.

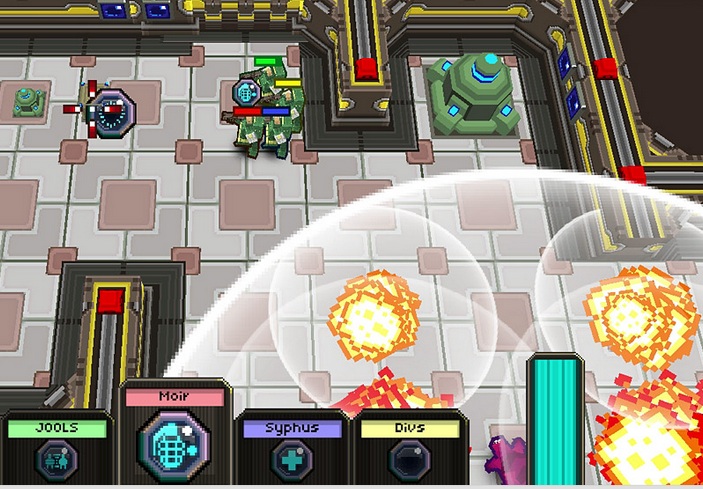
    At its heart Pineapple Smash Crew is about managing Chaos. It is a whirling, exploding, ballet where you are constantly trying to bring order in the face of total bedlam. I think as a species we value simplicity and order so it’s a strong theme.

    Bring Order to the Chaos!

    Managing chaos is also a powerful game mechanic because:

    1. pummeling it into order is fun
    2. while living in the chaos we are constantly being presented with new situations and small puzzles to solve

    Games are about making decisions. Every moment you play there are good moves to make and bad moves to make. You succeed by choosing the good moves. In this way every game is a puzzle game. Pineapple Smash Crew is a puzzle game with very quick turns.

    In all games the fun comes from improving. From learning to play the game better. We do this by recognising situations we’ve been in before and growing a catalog of good moves which fit that situation. In some games (especially old arcade games) we play the same level over and over. This makes it easy to recognise situations because we see them in the same order every time. Every enemy or jump is a small puzzle that it’s up to us to solve. Then we have to remember the solution and apply each one in order to beat the level. This is how you play a hard Mario or Mega Man level.

    These games have very little chaos in them. Because you can predict what’s coming you rarely have to improvise on the fly. Pineapple Smash Crew is different, it’s all about improvisation. In Pineapple you still have to build a catalog of situations, puzzles, and possible solutions to them. But in Pineapple you have to be more fluid in matching puzzles to solutions because you will never see exactly the same puzzle twice. Luckily our brains are really good at this. Just like we can recognise the letter “A” in many fonts we can recognise fundamentally simmilar gameplay situations.

    The more we play the more situations we can recognise and the more chaos we can endure. This is essentially what a difficulty curve is. It’s an attempt to present you with slight variations on puzzles you’ve already solved and require you to solve them more precisely and efficiently.

    Rich has done a great job of orchestrating this dance between order and chaos. You wont be thinking about cataloguing situations or slight variations, that all goes on in the subconscious. You’ll just be thinking “Oh god where is the next health pickup” and “Fuck Yeah!” when you blow the hell out of six guys with one well aimed rocket.

  • Debugging Shaders in Flash with PIX

    ** Update: It’s hard to tell but I think PIX is no longer a free app and is now part of Visual Studio :/ I have started using Intel’s profiler/debugger which is quite good but requires you to have an intel card you can use **

    What the Fuck!

    What the Fuck is it DOING!?

    Why in the name of hell isn’t it working?

    These are just a few of the fun phrases you can apply in the fun field of Shader programming with Flash’s new Stage3d API.

    Shaders are cool as hell. In my last post I wrote up an example of a pixel shader that makes grass wave in the wind. It was a pretty simple 7 line shader and I managed to write it without a debugger of any kind. The real problem comes when you want to write something more complicated. Then the lack of any solid feedback will start to drive you crazy. You will begin to fantasize about introducing axes to graphics cards with great force. Fortunately Microsoft, in a rare show of magnanimity, has given us a way out.

    There is a tool in DirectX Utilities called PIX which can be used to examine shader variables as well as step through their operation! In a perfect world that would be all the instruction required: use PIX. Unfortunately PIX has a bit of a learning curve and there are a few bends to the curve that are far from obvious so I’m going to tediously document every little step.

    I’m going assume you have the standalone flash player. But you will need that if you don’t have it. This example is going to use my simple Shader Testbed which you can download from this post.

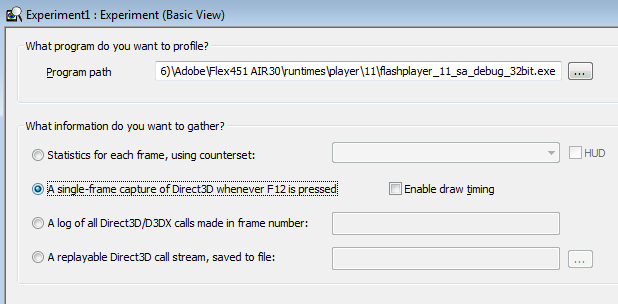
    First go download DirectX and install it. *I don’t think this link will get you PIX anymore* Now run PIX which is one of the DirectX Utilities in your start menu. Inside PIX select file->New Experiment You will be presented with a window that looks like this:

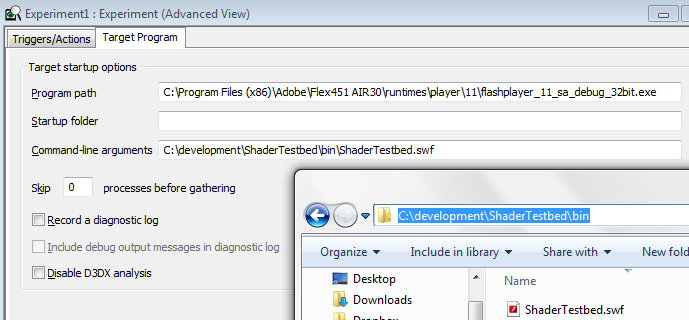
    Provide the path to your flash stand alone player in the Program path field. Select the “a single-frame capture of Direct3D whenever F12 is pressed” radio button. Now click the “more options” button and then the “Target Program” tab.

    In the “Command-line arguments” field fill in the path to your swf. Now hit “Start Experiment”. If your swf doesn’t start running then you’ve got a filename wrong or something.

    Ideally now your swf is running. Do whatever you have to do to get your shader running and the results on the screen. For my Shader Testbed example I’m going to paste in the wavy grass shader.

    The moment has come. Now hit F-12. This will capture the state of the program on that frame. Close your swf. This will bring up PIX’s analysis window which is chock-a-block with stuff. You want to debug a pixel and look at watch the shader modify its value. To do that:

    To get there:

    1. Select the frame you captured
    2. Select the render tab, this will bring up a screenshot of the frame in question
    3. Right click on the pixel you’re interested in and select “Debug This Pixel”

    Now you’ll get a list of draw calls pertaining to that pixel. Unfortunately for some reason it won’t include the draw call you care about. Or it will, but it won’t include your shader… or something. For whatever reason you can’t debug your shader from here. You can debug some shader here but you can’t debug your shader here.

    To debug your shader you have to select the specific draw call that displays your texture. You can find that by expanding the Frame and finding the draw call manually.

    After expanding the Frame press the “Next Draw Call” button. It’s a capital D with an arrow next to it. Then make sure you have the “render” tab open on the right.

    Watch the screenshot on the right and go from draw call to draw call until your texture shows up. Now stop hitting the “Next Draw Call” button or you’ll get back to the useless state. Ok, now go back to the Render window and right-click a pixel on your texture and select “Debug This Pixel”.

    This time it will actually work! Hit the “Debug Pixel” link and you will get to step through your shader code and inspect the registers!

    It’s not in AGAL, it’s in some other shader assembly but, you know, seen one shader assembly language you seen ’em all really.

    So, yeah, that did take a fair amount of work and yes, the turn around time between debug sessions isn’t great. But damn it shaders are super cool and if you want to do much with them then you’re going to have to be able to do some debugging.

    Hope you found this useful. It took me a while to figure out. Also, if you have trouble finding the right draw call you can always use the “Objects” window to find the memory address of your particular shader, search the Frame for that address, and then you know the next draw call is the one you want.

    Woo! Shaders!

  • Simple AGAL Shader Testbed

    This is a very quick testbed designed to help write Flash AGAL shaders.

    If you don’t know what a shader is you should read my Shader Post.

    [swf src=”http://northwaygames.com/wp-content/uploads/ShaderTest.swf” params=”wmode=direct” version=11 width=600 height=600]You must have Flash 11 for this to work[/swf]

    You can test it out by pasting in my “swaying grass” pixel shader:

    sub ft3, v1.y, fc1.y //offset = 1-y
    pow ft3, ft3, fc2 //offset = offset^3
    mul ft3, ft3.y, fc3 //offset = sin(count)*offset
    mul ft3, ft3, fc4 //offset *= .3
    add ft2, v1, ft3 //texturePos.x += offset
    tex ft1, ft2, fs0 <2d,linear,repeat,mipnearest> //pixel = texture(texturePos)
    mov oc, ft1 //return(pixel)

    If you replace the Pixel/Fragment shader with the above code and hit the “Render” button you’ll see the grass sway. See my Pixel Shader Example post for a full description of this AGAL code.

    The (hastily written) source is here: ShaderTestBed.

    And you can download the .swf Here.

  • A Pixel/Fragment Shader Example in Flash

    This is super cool. Now that Flash gives you access to the graphics card you can write pixel shaders!

    “uh ok… what’s a pixel shader? why would I want to write one?”

    Because shaders can make stuff move! And in games moving stuff is way better than not moving stuff. Like this grass:

    That is a kind of shitty animated gif of my pretty amazing moving grass. Like normal grass but with 100% more pixel shader magic. I’ve hacked up a quick shader sandbox here and with a little work you can see a live example of the grass there.

    Pixel Shaders are programs you write in assembly and upload to the graphics card. Then whenever you UV map a texture to a triangle the program decides how the mapping is done. If you want to know more about UV mapping you can check out my UV mapping tutorial.

    This post is an example of what you can do with pixel shaders in Flash’s Stage3d. If you want to replicate this then you need to first have something running in Stage3d. I recommend using Starling, a great 2d Stage3d platform. It takes a little work to get Starling working with custom meshes and pixel shaders but it makes everything else much easier. Also flash calls pixel shaders fragment shaders for some reason but that’s dumb so I’m going to call them pixel shaders.

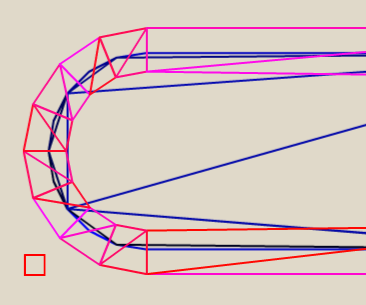
    Ok, I’m going to pick up right where the UV mapping tutorial left off. We have this mesh:

    With this texture UV mapped onto it:

    Now presumably, if you have something similar being displayed on your screen, you are already using a pixel and vertex shader. Without one you would see nothing. You probably have a really simple one though.

    Here are Starling’s simple shaders slightly modified for this example:

    //vertex shader
    “m44 op, va0, vc0 // 4×4 matrix transform to output clipspace
    “mov v0, va1 // pass color to fragment program
    “mov v1, va2 // pass texture coordinates to fragment program

    //pixel/fragment shader
    “tex ft1, v1, fs0 <2d,linear,repeat,mipnearest> // sample texture 0
    “mul ft2, ft1, v0 // multiply color with texel color
    “mul oc, ft2, fc0 // multiply color with alpha

    They’re simple but they’re written in AGAL. Which is Flash’s shader language. It’s basically assembly language you upload to the graphics card. But since flash just invented AGAL you’ve probably never seen it before.  I’ll explain how some of AGAL works as I go but if you’re really interestied in writing shaders Marco Scabia has already written a great primer on AGAL right here.

    We can almost ignore the vertex shader above. All we care about is that it tells our pixel shader what pixel of the texture to grab. It does that by passing the coordinate in the variable v1. Which is a register shared by the two programs.

    The pixel shader then copies the pixel at texture coordinate v1  into temporary register ft1 (tex ft1, v1, fs0).

    Then it does some bullshit we don’t care about but ends up copying the pixel into the output register oc. If you wanted to you could write the worlds simplest pixel shader. It would looks like this:

    tex oc, v1, fs0 <2d,linear,repeat,mipnearest> // sample texture 0

    Which just copies the colour of the pixel at position v1 in texture fs0 to the output register 0c.

    This gets called for every single pixel that gets displayed so we can do per-pixel manipulation and per-pixel animation. And if we can then we should.

    To get our grass animatin’ we have to do some work both in Flash and in the pixel shader.

    Lets start with the flash code since we need it to pass some constants into the pixel shader. Here is a pared-down example of rendering some triangles with a bunch of important stuff cut out.

    AGAL is a little crazy about constants. Instead of defining them in your assembly you have to pass them to the graphics card when you render out the triangles. So if you want to do something like i = i + 1 you have to pass in the value 1 as a constant. That’s what most of the following lines are. They’re just constants we use in the shader program.

    It’s also worth noting that in AGAL every register (variable) is a 4-dimensional vector. Or a four length array or however you want to think about it. These four components tend to represent x, y, z, w when you’re dealing with space and r, g, b, a when you’re dealing with colour.

    So, lets pass in those constants.

    context.setProgram(grassShader);
    
    context.setProgramConstantsFromVector(
      Context3DProgramType.FRAGMENT, 1, Vector.<Number>([1, 1, 1, 1])); //fc1
    context.setProgramConstantsFromVector(
      Context3DProgramType.FRAGMENT, 2, Vector.<Number>([3, 3, 3, 3])); //fc2
    context.setProgramConstantsFromVector(
      Context3DProgramType.FRAGMENT, 3, Vector.<Number>([Math.sin(_grassCount), 0, 0, 0])); //fc3
    context.setProgramConstantsFromVector(
      Context3DProgramType.FRAGMENT, 4, Vector.<Number>([.3, 0, 0, 0])); //fc4
    
    context.drawTriangles(mIndexBuffer, 0, mTriangles.length/3);
    _grassCount = (_grassCount + .015) % (Math.PI * 2);

    Really, the only interesting thing here is _grassCount. We want the grass to wave back and forth so we need something to oscilate over several frames. Hey sin oscilates! So we keep a class variable that moves between 0 and 2*PI and pass the sin of that into the shader program. That variable will move back and forth between -1 and 1 so we can offset the grass pixels by that amount and it will wave back and forth.

    Now it’s time to write some assembly! Woo! Writing assembly is just like writing normal code except it takes forever and in the end not even you can read your code. Comment the shit out of it.

    Most of the grass code is preoccupied with finding the offset between what pixel we would normally display and the pixel we want to display in its stead. Think of the temporary register ft3 as a variable named offset that we build up over four lines. Here it is, 7 lines of glory. I’ll got over each line below:

    sub ft3, v1.y, fc1.y //offset = 1-y
    pow ft3, ft3, fc2 //offset = offset^3
    mul ft3, ft3.y, fc3 //offset = sin(count)*offset
    mul ft3, ft3, fc4 //offset *= .3
    add ft2, v1, ft3 //texturePos.x += offset
    tex ft1, ft2, fs0 <2d,linear,repeat,mipnearest> //pixel = texture(texturePos)
    mov oc, ft1 //return(pixel)

    You can see this shader in action over in my shader sandbox.

    Remember, this is being called on every pixel but we want the pixels near the roots to stand still and the pixels at the very top to wave back and forth the most. The easiest way to do that is to multiply stuff by the height but in our UV mapping the top is at position 0 and the bottom is at 1 so first we reverse that:

    sub ft3, v1.y, fc1.y //offset = 1-y

    We don’t want a linear difference between the top and the bottom or the grass wouldn’t “bend”. So we pow that shit:

    pow ft3, ft3, fc2 //offset = offset^3

    Now we scale the offset by the number that is oscillating between -1 and 1:

    mul ft3, ft3.y, fc3 //offset = sin(_grassCount)*offset

    But that results in swaying that is over exaggerated so we tone it down:

    mul ft3, ft3, fc4 //offset *= .3

    It’s worth noting that fc4 is [.3, 0, 0, 0] which zeroes out any extraneous y values that might be hanging around. We only want to change the x.

    Done! Well actually this doesn’t reproduce the results above. With this shader the grass all sways back and forth in time instead of following an invisible “wave”. But I’ll leave the rest as an exercise for the reader.

    Wow, good thing it worked the first time eh? Debugging this stuff must be a mess since you can’t use a debugger on the graphics card or even print out variables.

    Well next time I’ll give you a hand with that debugging thing!