• A Pixel/Fragment Shader Example in Flash

    This is super cool. Now that Flash gives you access to the graphics card you can write pixel shaders!

    “uh ok… what’s a pixel shader? why would I want to write one?”

    Because shaders can make stuff move! And in games moving stuff is way better than not moving stuff. Like this grass:

    That is a kind of shitty animated gif of my pretty amazing moving grass. Like normal grass but with 100% more pixel shader magic. I’ve hacked up a quick shader sandbox here and with a little work you can see a live example of the grass there.

    Pixel Shaders are programs you write in assembly and upload to the graphics card. Then whenever you UV map a texture to a triangle the program decides how the mapping is done. If you want to know more about UV mapping you can check out my UV mapping tutorial.

    This post is an example of what you can do with pixel shaders in Flash’s Stage3d. If you want to replicate this then you need to first have something running in Stage3d. I recommend using Starling, a great 2d Stage3d platform. It takes a little work to get Starling working with custom meshes and pixel shaders but it makes everything else much easier. Also flash calls pixel shaders fragment shaders for some reason but that’s dumb so I’m going to call them pixel shaders.

    Ok, I’m going to pick up right where the UV mapping tutorial left off. We have this mesh:

    With this texture UV mapped onto it:

    Now presumably, if you have something similar being displayed on your screen, you are already using a pixel and vertex shader. Without one you would see nothing. You probably have a really simple one though.

    Here are Starling’s simple shaders slightly modified for this example:

    //vertex shader
    “m44 op, va0, vc0 // 4×4 matrix transform to output clipspace
    “mov v0, va1 // pass color to fragment program
    “mov v1, va2 // pass texture coordinates to fragment program

    //pixel/fragment shader
    “tex ft1, v1, fs0 <2d,linear,repeat,mipnearest> // sample texture 0
    “mul ft2, ft1, v0 // multiply color with texel color
    “mul oc, ft2, fc0 // multiply color with alpha

    They’re simple but they’re written in AGAL. Which is Flash’s shader language. It’s basically assembly language you upload to the graphics card. But since flash just invented AGAL you’ve probably never seen it before.  I’ll explain how some of AGAL works as I go but if you’re really interestied in writing shaders Marco Scabia has already written a great primer on AGAL right here.

    We can almost ignore the vertex shader above. All we care about is that it tells our pixel shader what pixel of the texture to grab. It does that by passing the coordinate in the variable v1. Which is a register shared by the two programs.

    The pixel shader then copies the pixel at texture coordinate v1  into temporary register ft1 (tex ft1, v1, fs0).

    Then it does some bullshit we don’t care about but ends up copying the pixel into the output register oc. If you wanted to you could write the worlds simplest pixel shader. It would looks like this:

    tex oc, v1, fs0 <2d,linear,repeat,mipnearest> // sample texture 0

    Which just copies the colour of the pixel at position v1 in texture fs0 to the output register 0c.

    This gets called for every single pixel that gets displayed so we can do per-pixel manipulation and per-pixel animation. And if we can then we should.

    To get our grass animatin’ we have to do some work both in Flash and in the pixel shader.

    Lets start with the flash code since we need it to pass some constants into the pixel shader. Here is a pared-down example of rendering some triangles with a bunch of important stuff cut out.

    AGAL is a little crazy about constants. Instead of defining them in your assembly you have to pass them to the graphics card when you render out the triangles. So if you want to do something like i = i + 1 you have to pass in the value 1 as a constant. That’s what most of the following lines are. They’re just constants we use in the shader program.

    It’s also worth noting that in AGAL every register (variable) is a 4-dimensional vector. Or a four length array or however you want to think about it. These four components tend to represent x, y, z, w when you’re dealing with space and r, g, b, a when you’re dealing with colour.

    So, lets pass in those constants.

    context.setProgram(grassShader);
    
    context.setProgramConstantsFromVector(
      Context3DProgramType.FRAGMENT, 1, Vector.<Number>([1, 1, 1, 1])); //fc1
    context.setProgramConstantsFromVector(
      Context3DProgramType.FRAGMENT, 2, Vector.<Number>([3, 3, 3, 3])); //fc2
    context.setProgramConstantsFromVector(
      Context3DProgramType.FRAGMENT, 3, Vector.<Number>([Math.sin(_grassCount), 0, 0, 0])); //fc3
    context.setProgramConstantsFromVector(
      Context3DProgramType.FRAGMENT, 4, Vector.<Number>([.3, 0, 0, 0])); //fc4
    
    context.drawTriangles(mIndexBuffer, 0, mTriangles.length/3);
    _grassCount = (_grassCount + .015) % (Math.PI * 2);

    Really, the only interesting thing here is _grassCount. We want the grass to wave back and forth so we need something to oscilate over several frames. Hey sin oscilates! So we keep a class variable that moves between 0 and 2*PI and pass the sin of that into the shader program. That variable will move back and forth between -1 and 1 so we can offset the grass pixels by that amount and it will wave back and forth.

    Now it’s time to write some assembly! Woo! Writing assembly is just like writing normal code except it takes forever and in the end not even you can read your code. Comment the shit out of it.

    Most of the grass code is preoccupied with finding the offset between what pixel we would normally display and the pixel we want to display in its stead. Think of the temporary register ft3 as a variable named offset that we build up over four lines. Here it is, 7 lines of glory. I’ll got over each line below:

    sub ft3, v1.y, fc1.y //offset = 1-y
    pow ft3, ft3, fc2 //offset = offset^3
    mul ft3, ft3.y, fc3 //offset = sin(count)*offset
    mul ft3, ft3, fc4 //offset *= .3
    add ft2, v1, ft3 //texturePos.x += offset
    tex ft1, ft2, fs0 <2d,linear,repeat,mipnearest> //pixel = texture(texturePos)
    mov oc, ft1 //return(pixel)

    You can see this shader in action over in my shader sandbox.

    Remember, this is being called on every pixel but we want the pixels near the roots to stand still and the pixels at the very top to wave back and forth the most. The easiest way to do that is to multiply stuff by the height but in our UV mapping the top is at position 0 and the bottom is at 1 so first we reverse that:

    sub ft3, v1.y, fc1.y //offset = 1-y

    We don’t want a linear difference between the top and the bottom or the grass wouldn’t “bend”. So we pow that shit:

    pow ft3, ft3, fc2 //offset = offset^3

    Now we scale the offset by the number that is oscillating between -1 and 1:

    mul ft3, ft3.y, fc3 //offset = sin(_grassCount)*offset

    But that results in swaying that is over exaggerated so we tone it down:

    mul ft3, ft3, fc4 //offset *= .3

    It’s worth noting that fc4 is [.3, 0, 0, 0] which zeroes out any extraneous y values that might be hanging around. We only want to change the x.

    Done! Well actually this doesn’t reproduce the results above. With this shader the grass all sways back and forth in time instead of following an invisible “wave”. But I’ll leave the rest as an exercise for the reader.

    Wow, good thing it worked the first time eh? Debugging this stuff must be a mess since you can’t use a debugger on the graphics card or even print out variables.

    Well next time I’ll give you a hand with that debugging thing!

  • UV Mapping in Flash

    Now that Flash is playing nicely with the graphics card we can start playing with textures and triangle meshes! Woo! Excitement!

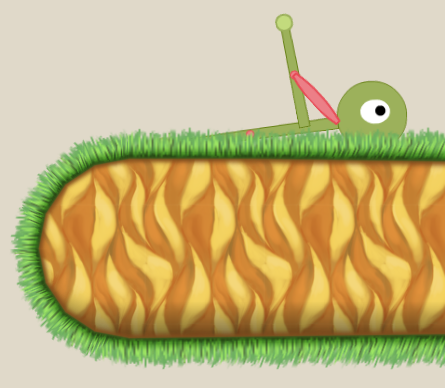
    Why would you want to bother playing with meshes and texture mapping? Well we can use Pixel Shaders which are cool as hell! Or mabey you want to draw a nice grass border around your terrain? Like bellow:


    Nifty right? Also it’s easy and fast thanks to the piece of silicon in your computer that wants to do nothing but map texture coordinates to triangles. This uses Flash’s new Stage3d code to skin a texture map but it isn’t a beginning tutorial on Stage3d. There’s one right here if you want one. Or you can google your way to another if you like. Personally I use the 2d Stage3d framework Starling. It takes a little work to get Starling working with triangle meshes but it makes everything else much easier.

    This is a discussion about 2d graphics programming, specifically in stretching a texture around a 2d triangle mesh.

    First you need a triangle mesh and a grass texture to stretch around it. The above image uses this triangle mesh:

    And the grass texture is stolen from Rich Edwards under false pretenses.

    Then you need to make the two have sex. That’s called UV mapping. UV mapping is telling the graphics card how stretch a texture (the grass) over a triangle (the mesh).

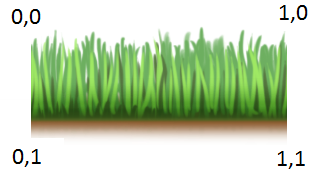
    UV coordinates aren’t measured in pixels. They are measured from 0 to 1. So in Rich’s grass texture the coordinate system looks like this:

    So for each vertex of the triangle we have to figure out what part of the grass that vertex represents.

    In the case of the grass border we can do the mapping like thus:

    var globalLength:Number = 0;
    
    //each loop skins one polygon made of an upper and a lower triangle
    for (var i:int = 0; i < mTriangles.length; i += 6) {
      var localLength:Number;
      //length of the poly along the top
      var localLengthTop:Number = b2Math.Distance(mTriangles[i], mTriangles[i + 1]);
      //length of the poly along the bottom
      var localLengthBottom:Number = b2Math.Distance(mTriangles[i + 3], mTriangles[i + 5]);
      //use whichever is greater (sometimes one will be zero length)
      localLength = localLengthBottom > localLengthTop ? localLengthBottom : localLengthTop;
    
      //scale by the width of the texture
      var texLen:Number = localLength / 120;
    
      //upper triangle
      mVertexData.setTexCoords(i, globalLength, 0);
      mVertexData.setTexCoords(i+1, globalLength + texLen, 0);
      mVertexData.setTexCoords(i+2, globalLength, 1);
    
      //lower triangle
      mVertexData.setTexCoords(i+3, globalLength, 1);
      mVertexData.setTexCoords(i+4, globalLength + texLen, 0);
      mVertexData.setTexCoords(i + 5, globalLength + texLen, 1);
    
      globalLength += texLen;
    }

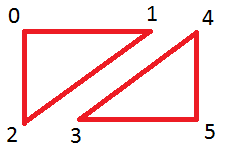
    So here’s what that code is doing. Each loop is mapping two triangles that make up a polygon like this:

    Each vertex is just stored in a long-ass array called mTriangles. They are stored in a particular order as shown above (note that they are stored as two separate triangles and not as a proper tri-strip with a shared edge… I should do that).

    Now we need to figure out what chunk of grass each of those vertices is sitting over. We use a pretty simple algorithm where the top y is always 0 and the bottom y is always 1. Then we just make the x of vertex 1, 4, and 5 equal to the distance between 0 and 1. We call that the localLength in the code. Easy peasy!

    Then for the next triangle all we have to do is remember how far along we were in the last triangle and start there instead of at 0. We call that the globalLength in the code.

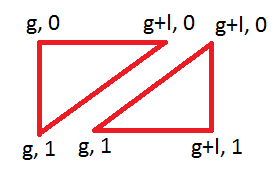
    So the position of the points looks like this:

    where 'g' = globalDistance and 'l' = localDistance

    We don’t have to worry about the x values becoming greater than 1. As long as the texture is set to repeat everything will be cool. So that leaves us with a pair of triangles looking like this:

    And that’s it.

    For 2d games UV mapping isn’t rocket science and this is probably about as complicated as you’ll ever get. Mapping the inside of the terrain is ridiculously simple and looks like this:

    for (var i:int = 0; i < mTriangles.length; i++) {
      mVertexData.setTexCoords(i, mTriangles[i].x/120, mTriangles[i].y/120);
    }

    How easy is that?

    So now that we can UV map we’re finally ready to get on to Shaders! Which is what I really want to talk about!

  • Migrating to Starling 2: Manage Your Texture Memory

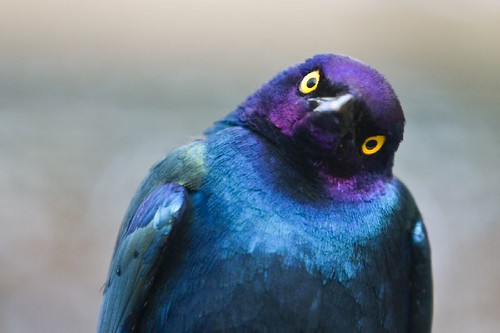
    Quizzical Starling by BrianScott

    Welcome back. This is part 2 of migrating and existing project to Flash’s Stage3d. You want to do this because Stage3d uses the graphics card to display graphics which is way faster than doing everything in software.

    Starling is an excellent 2d framework that makes Adobe’s Stage3d code more manageable. We’ll use that to make the migration way easier. You can find the basics of getting your project to compile with starling in part 1. Done that already? Awesome.

    So your code is now compiling but you’re probably seeing a lot of this runtime error: “Error #3691: Resource limit for this resource type exceeded.”

    You are out of space
    You are out of space

    That means you are out of texture memory.

    This is because you aren’t managing your texture memory at all. Every time you call the imageFromSprite method from the last post you add a texture to memory but you never remove textures.

    Starling really wants to you to define all the graphics you use in sprite sheets and then manage texture memory by loading and unloading those sheets. It’s a good idea and I’m slowly moving Incredipede over to this method of texture management. But I don’t want to do that all at once. The project is too big to do a massive overhaul of the whole graphical system all at once. Instead I need an intermediate stage where I can keep instantiating graphics wherever I damn well please. So I needs a central place to manage my textures. This is where the TextureManager class comes in handy.

    I’ve started fleshing out a TextureManager that helps you keep all the textures that might be comming from anywhere under control. It’s still a work in progress so it’s not genius but at least it will give you some structure.

    TextureManager.as


    The most important part of the TextureManager is:

    protected var _textures:Dictionary;

    The TextureManager keeps track of every texture you instantiate. Now you always know the state of your texture memory and finding leaking textures is just a matter of calling TextureManager.i.traceAllocatedTextures().

    To make this work we have to provide a little more information to the TextureManager whenever we instantiate a new texture so the central imageFromSprite method has gained a few new parameters.

    public function imageFromSprite
     (textureName:String, sprite:DisplayObject, replaceTexture:Boolean = false)
     :Image

    In addition to the sprite we want to texturize we have to give it a textureName. This is an English readable handle for the texture. This is what pops out of traceAllocatedTextures and it also lets us refrence the texture later.

    Say we have a “saveButton” texture we use all over the place. Now we can just call TextureManager.i.imageFromSprite(“savebutton”, new SprSaveButton()); whenever we need a save button and the TextureManager will upload it to texture memory if it needs it and it will just reuse the texture if it already has it.

    Very rarely you will want to be constantly replacing a texture with a new version. A lot of the temp art in Incredipede is just graphics.drawRect calls. Eventually this will be replaced by real art but in the mean time those rects are changing in shape and size a lot so it’s easier for me to just do this:

    var sp:Sprite = new Sprite();
    sp.graphics.beginFill(_muscle.colourContract.hex);
    ...
     sp.graphics.endFill();
     _canvas = TextureManager.i.imageFromSprite("muscleSkin:"+Utils.memAddess(this), sp, true);

    This code will replace the given muscle texture every time it’s called. A couple things are going on here. Most importantly I’m passing in “true” for the replaceTexture parameter of imageFromSprite. This tells the textureManager to replace any texture that has the same name. It will deallocate the old texture and upload the new one. Uploading new textures all the time like this is slow and a bad idea but as an intermediate step it works. Now I have an ever-changing muscle that isn’t leaking into texture memory every time it changes.

    But now every muscle needs a unique name or all muscles will share one texture. I append the memory address of the object to make the name unique. Flash doesn’t give you convenient access to the memory address but you can pull it out of an invalid cast error message:

    public static function memAddess(o:Object):String
    {
      try{
        ByteArray(o);
      }catch (e:Error){
        return String(e).replace(/.*([@|\$].*?) to .*$/gi, '$1');
      }
      return "Unkown";
    }
    
    
    Some Textures in Memory

    Now when you want to start freeing textures you have a few options. You can set up a bunch of deconstructors and call TextureManager.i. freeTexture(“cherry”). Or you can free all those terrible textures that are constantly being replaced (like the muscle example above) with TextureManager.i. freeVolatileTextures(). Or you can free all the textures beginning with a certain prefix with TextureManager.i. freePrefix(“optionsMenu”).

    What’s important is that you’re keeping track of all your textures and not leaking them uncontrollably into memory.


    Now your project is working! Unless you use any MovieClips of course… those are just being displayed as stills.

    Well, very quickly, I’ve written a wrapper to convert flash MovieClips to starling MovieClips on the fly and add in “stops”. You should be converting your MovieClips to sprite sheets. That will be faster, but in the mean time this will upload all the frames to texture memory and then let you gotoAndPlay whatever you like.

    ConvertedMovieClip.as

    Pretty easy to use:

    _startButton = new ConvertedMovieClip(new MovStartButton());
    _startButton.addStop(18);
    _startButton.addStop(38);
    addChild(_startButton);

    The addStop method is the equivalent of putting a stop(); command on that frame in the MovieClip. It’s functionality I always end up using so I threw it into the ConvertedMovieClip class. This class might mess up the positioning of your MovieClips slightly. Sorry about that.


    Now you really are done! Your game is running just like it was before you started! Except now it’s blindingly fast! Congratulations!

    You also have access to cool stuff like UV mapped triangle meshes and pixel shaders! In fact you can find my UV Mapping tutorial right here.

    Central Park Avians by Professor Bop
  • Migrating to Starling 1: Get it to Compile

    Starlings by onkel_wart

    Welcome to the first of Colin Northway’s “I’m Too Busy Writing Games to Write Technical Blog Posts So I’ll Just Write a Shoddy Technical Blog Post Really Quickly Instead”.

    This Shoddy blog post is the first of two on migrating an existing project to Starling and Falsh’s Stage3d. You can find part 2 here.

    Well Flash is now all jiggy with the graphics card and even though you started your project a year ago you’re definitely going to want to get all jiggy too. Putting graphics on the graphics card is way faster and you get all those extra CPU cycles to do cool things like physics. Plus you can play with neat things like Pixel Shaders which I’ll talk about in a future post.

    This is all based on my experience converting Incredipede and is really just intended to provide a vague roadmap through the experience. This first post will merely be about getting your project swapped over and compiling. The next one will be about making your Stage3d code suck less.

    First thing’s first: go download Starling. Starling is a 2d Stage3d framework being written by Daniel Sperl. It wraps the flexible but verbose Stage3d stuff into a Display-List-like interface. It’s open source, Daniel is constantly working on it, the community is growing and helpful, and it’s quite good so it’s prolly the way to go for 2d Flash games from now on. Also, it closely replicates the way Flash did things before Stage3d existed so it’s going to make it much easier to convert your existing project.

    To get you going, you’ll need to grab the newest versions of the Flex SDK, either the AIR SDK or playerglobal.swc, and the Starling SDK, point your project at them and add “-swf-version=13” to your compiler options. Read the first part of the quite good Starling Introduction by Thibault Imbert, and come back when you call starling.start();

    Now that you have Starling all up and running it’s time to do some mass search and replaces. This would be a really really good time to back up your code. It’s pretty hard to undo the changes we’re going to make so please back it up in case you get half way through and decide I’m an idiot who led you astray.

    Now to work: time to grab the Flash display list, yank out the spine, and then stuff Starling down in the hole left behind.

    Search and replace the following:

    “import flash.display.DisplayObject;” with “import starling.display.DisplayObject;”

    “import flash.display.Sprite;” with “import starling.display.Sprite;”

    “import flash.display.MovieClip;” with “import starling.display.MovieClip;”

    Now everything is going to be broken and you’re going to get a lot of Compile Time errors, mostly where you add graphics to the game. Less’ fix ’em!

    An Error has Occured

    There are three ways you might be getting graphics into your game at the moment. You might be embedding images, you might be embedding MovieClips and you might be using the flash 2d graphics drawing API. Incredipede uses all 3 so I’ve got a system in place to deal with all of them. Let’s deal with embedding images and MovieClips first.

    Most of your compile time errors are going to be where you .addChild(new Graphic()); because starling’s Sprite.addChild method takes a starling.display.DisplayObject not a flash.display.DisplayObject.

    It’s just going to take a little grunt work to make these errors go away. We’re going to do it in a very easy, very bad way and then after you have everything running we’ll go back and make everything suck less (in the next post).

    First let’s make up a very simple, static, texture manager class:

    public class TextureManager
    {
        public static function imageFromSprite(sprite:DisplayObject):Image
        {
            var rect:Rectangle = sprite.getBounds(sprite);
    
            var image:Image = new Image(textureFromSprite(sprite));
            image.x = rect.x;
            image.y = rect.y;
    
            return image;
        }
    
        public static function textureFromSprite(sprite:DisplayObject):Texture
        {
            var rect:Rectangle = sprite.getBounds(sprite);
    
            if ( rect.width > 2048 ) {
                rect.width = 2048;
                trace("Bitmap too big, shrinking");
            }
            if ( rect.height > 2048 ) {
                rect.height = 2048;
                trace("Bitmap too big, shrinking");
            }
    
            //red box means invalid texture
            if ( rect.width <= 2 || rect.height <= 2 ) {
                var tempSprite:flash.display.Sprite = new flash.display.Sprite();
                tempSprite.graphics.beginFill(0xFF0000);
                tempSprite.graphics.drawRect(0, 0, 50, 50);
                sprite = tempSprite;
                rect = sprite.getBounds(sprite);
            }
    
            var bmd:BitmapData = new BitmapData(
                rect.width, rect.height, true, 0x0000000000);
            var matrix:Matrix = new Matrix();
            matrix.translate( -rect.x, -rect.y);
    
            // draw the shape on the bitmap
            bmd.draw(sprite, matrix);
    
            var texture:Texture = Texture.fromBitmapData(bitmapData);
    
            return texture;
        }
    }

    This takes whatever DisplayObject you just passed in, converts it to a bitmap and then uploads it to the graphics card. Now you can go replace all of your:

    addChild(new Graphic())

    with this call:

    addChild(TextureManager.imageFromSprite(new Graphic()));

    That should work for Sprites and MovieClips (alhtough they wont animate) and .PNGs and anything you might embed.

    So that will have killed a lot of errors but there are still a lot left. Among them are all those graphics.beginFill calls which now make no sense.

    To make those errors go away just draw to an intermediate sprite and pass that to imageFromSprite() like this:

    var sp:Sprite = new Sprite();
    sp.graphics.stuff
    sp.graphics.etc...
    addChild(TextureManager.imageFromSprite(sp));

    WARNING: you are now leaking horribly into texture memory. Read part 2 if you are interested in how I stopped this.

    Now all your graphics problems should be gone. You’re close to having things at least running. Well, if all those Event errors weren’t staring at you pretty menacingly you’d be close.

    Starling replaces the Flash event model with its own. I’m not totally in love with this decision but whatever, we can work with it. More search and replace!

    replace “import flash.events.Event;” with “import starling.events.Event;”

    Now all your event classes extend Starling.event.Event so you have to go remove all the clone() methods from them. That’s one upside to Starlings events. One of the down sides is that all your MouseEvents just stopped working.

    That sucks pretty hard right? Well, if you step into this back alley I have some candy you might like. Just don’t tell anyone you got this from me…

    Starling handles mouse events in a totally different way than Flash. Which is too bad because Incredipede was written to use Flash’s mouse events and changing the way everything works is going to kind of suck. But if we put this method in a Utils class:

    public static function addMouseListener(mouseEvent:String,
        target:starling.display.DisplayObject, callback:Function):void
    {
        target.addEventListener( TouchEvent.TOUCH, function( event:TouchEvent ):void {
            var touch:Touch = event.getTouch(target.stage);
            var newEvent:MouseEvent;
            if ( mouseEvent == MouseEvent.MOUSE_DOWN
                && touch.phase == TouchPhase.BEGAN ) {
                newEvent = new MouseEvent(MouseEvent.MOUSE_DOWN, false);
            }else if ( mouseEvent == MouseEvent.MOUSE_MOVE
                && touch.phase == TouchPhase.MOVED ) {
                newEvent = new MouseEvent(MouseEvent.MOUSE_MOVE, false);
            }else if ( (mouseEvent == MouseEvent.MOUSE_UP
                || mouseEvent == MouseEvent.CLICK)
                && touch.phase == TouchPhase.ENDED ) {
                newEvent = new MouseEvent(MouseEvent.MOUSE_UP, false);
            }
            if ( newEvent != null ) {
                callback(newEvent);
            }
        });
    }

    Then we can replace

    button.addEventListener(MouseEvent.MOUSE_DOWN, loadMain);

    with

    Utils.addMouseListener(MouseEvent.MOUSE_DOWN, button, loadMain);

    Of course this is pretty limited. You can’t get the mouse position from the event or anything (although you could make position work) but it’s a quick and dirty way to make your code compile.

    In fact at this point your game should be running! On the graphics card! Really fast! Or actually, you might be uploading a lot of textures to the graphics card every frame depending on how your game works so it might instead be Really slow! Which we’ll fix next time.

    I welcome other suggestions if you’ve found better ways to do some of this stuff. Stay tuned for my next post when I discuss “how to make your Stage3d code suck less”. See you then!

    starlings on wires by Hopefoote
  • Incredipede Christmas

    My folks got me these great Incredipede themed pins from Illuminati Glassworks on Gabriola Island. Gabriola is a small island off of the coast of British Columbia. Sarah and I are spending Christmas in B.C. on Vancouver Island where I grew up. Gabriola is known for supporting a lot of interesting artists.

    We’ll see what happens to them… I only have like 10 so I guess I’ll give them to friends? Or mabey I’ll do some kind of contest…?