Now that Flash is playing nicely with the graphics card we can start playing with textures and triangle meshes! Woo! Excitement!
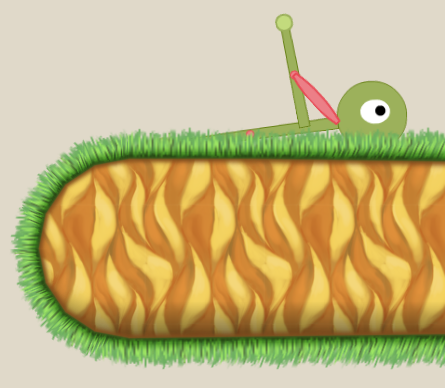
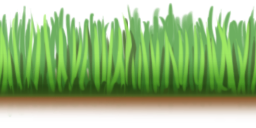
Why would you want to bother playing with meshes and texture mapping? Well we can use Pixel Shaders which are cool as hell! Or mabey you want to draw a nice grass border around your terrain? Like bellow:
Nifty right? Also it’s easy and fast thanks to the piece of silicon in your computer that wants to do nothing but map texture coordinates to triangles. This uses Flash’s new Stage3d code to skin a texture map but it isn’t a beginning tutorial on Stage3d. There’s one right here if you want one. Or you can google your way to another if you like. Personally I use the 2d Stage3d framework Starling. It takes a little work to get Starling working with triangle meshes but it makes everything else much easier.
This is a discussion about 2d graphics programming, specifically in stretching a texture around a 2d triangle mesh.
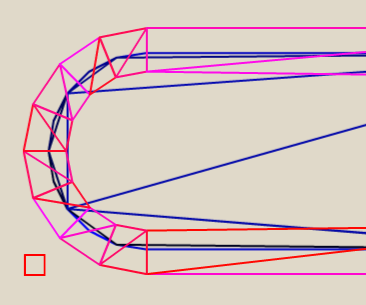
First you need a triangle mesh and a grass texture to stretch around it. The above image uses this triangle mesh:
And the grass texture is stolen from Rich Edwards under false pretenses.
Then you need to make the two have sex. That’s called UV mapping. UV mapping is telling the graphics card how stretch a texture (the grass) over a triangle (the mesh).
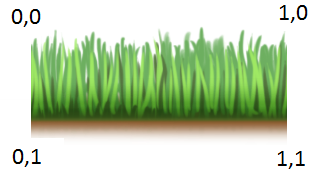
UV coordinates aren’t measured in pixels. They are measured from 0 to 1. So in Rich’s grass texture the coordinate system looks like this:
So for each vertex of the triangle we have to figure out what part of the grass that vertex represents.
In the case of the grass border we can do the mapping like thus:
var globalLength:Number = 0;

//each loop skins one polygon made of an upper and a lower triangle
for (var i:int = 0; i < mTriangles.length; i += 6) {
  var localLength:Number;
  //length of the poly along the top
  var localLengthTop:Number = b2Math.Distance(mTriangles[i], mTriangles[i + 1]);
  //length of the poly along the bottom
  var localLengthBottom:Number = b2Math.Distance(mTriangles[i + 3], mTriangles[i + 5]);
  //use whichever is greater (sometimes one will be zero length)
  localLength = localLengthBottom > localLengthTop ? localLengthBottom : localLengthTop;

  //scale by the width of the texture
  var texLen:Number = localLength / 120;

  //upper triangle
  mVertexData.setTexCoords(i, globalLength, 0);
  mVertexData.setTexCoords(i+1, globalLength + texLen, 0);
  mVertexData.setTexCoords(i+2, globalLength, 1);

  //lower triangle
  mVertexData.setTexCoords(i+3, globalLength, 1);
  mVertexData.setTexCoords(i+4, globalLength + texLen, 0);
  mVertexData.setTexCoords(i + 5, globalLength + texLen, 1);

  globalLength += texLen;
}
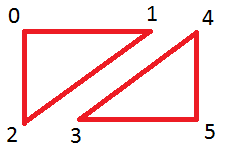
So here’s what that code is doing. Each loop is mapping two triangles that make up a polygon like this:
Each vertex is just stored in a long-ass array called mTriangles. They are stored in a particular order as shown above (note that they are stored as two separate triangles and not as a proper tri-strip with a shared edge… I should do that).
Now we need to figure out what chunk of grass each of those vertices is sitting over. We use a pretty simple algorithm where the top y is always 0 and the bottom y is always 1. Then we just make the x of vertex 1, 4, and 5 equal to the distance between 0 and 1. We call that the localLength in the code. Easy peasy!
Then for the next triangle all we have to do is remember how far along we were in the last triangle and start there instead of at 0. We call that the globalLength in the code.
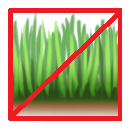
So the position of the points looks like this:
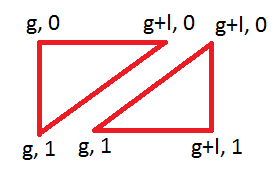
We don’t have to worry about the x values becoming greater than 1. As long as the texture is set to repeat everything will be cool. So that leaves us with a pair of triangles looking like this:
And that’s it.
For 2d games UV mapping isn’t rocket science and this is probably about as complicated as you’ll ever get. Mapping the inside of the terrain is ridiculously simple and looks like this:
for (var i:int = 0; i < mTriangles.length; i++) {
  mVertexData.setTexCoords(i, mTriangles[i].x/120, mTriangles[i].y/120);
}
How easy is that?
So now that we can UV map we’re finally ready to get on to Shaders! Which is what I really want to talk about!

Comments
5 responses to “UV Mapping in Flash”
[…] like UV mapped triangle meshes and pixel shaders! In fact you can find my UV Mapping tutorial right here. Central Park Avians by Professor […]
Could you tell me how you created the triangle mesh? I am wanting to see if I can manipulate an image using this method.
Thanks for any help :-)
Also are you able to publish your source so that i can get a better understanding of how you have implemented it with Starling.
Thanks
Chris, I’m assuming his triangles are from whatever physics engine is in use. So those triangles are actually what you would see in the debug draw mode of Box2D or Nape or whatever engine you were using.
There is mistake :
mVertexData.setTexCoords(i, mTriangles[i].x/120, mTriangles[i].y/120);
replace to:
mVertexData.setPosition(i, mTriangles[i].x/120, mTriangles[i].y/120);